


Introduction
LangGraph is built on top of LangChain. One of the common patterns we see when people are creating more complex LLM applications is the introduction of cycles into the runtime. These cycles often use the LLM to reason about what to do next in the cycle. A big unlock of LLMs is the ability to use them for these reasoning tasks. This can essentially be thought of as running an LLM in a for-loop. These types of systems are often called agents.
It adds new value primarily through the introduction of an easy way to create cyclical graphs. This is often useful when creating agent runtimes.
Don't worry if this all seems very daunting (it was the same for me😨 not a long time ago). We will break down how this state-of-the-art library works and how we can use it to make amazing AI Agents.
LagGraph: Level 1
Basic Components in the LangGraph Workflow:
Node - Think these node are part of a graph and they just call a function on the input they have and pass the output. Nothing else
Edge - Like any graph it is the connection between any 2 node where output of one node is passed as input to the second node
Entry_Point - It's just a node which gets the initial user prompt as it's input
Finish_Point - It's also just a node that gives the output to the user
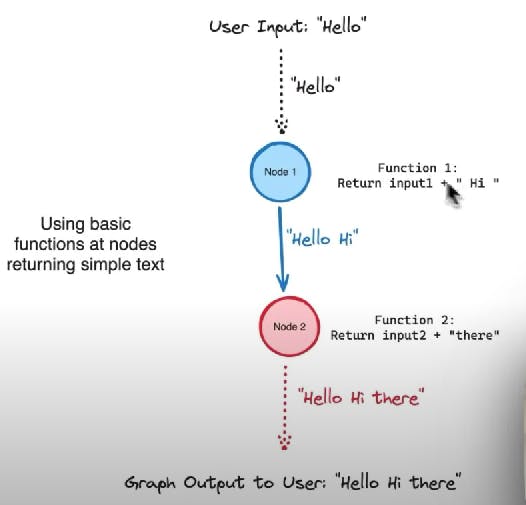
The above illustration is an example of the simplest graph where we can see node 1,2 are just calling function 1,2. And the output of node 1 or function call 1 is a input for the node 2/ function call 2
Define Nodes (aka functions) --> Define edges between Nodes --> Define Entry Point --> Define Finish Point
Also node 1 acts as a starting point as it gets the initial user prompt as input. And node 2 is the Finish_Point as it's output is the Graph Output to the user.
Now let's try to code this out step by step. First, let's install all the dependencies for this project
pip install langchain-openai langgraph python-dotenv
def function1(input1:str)->str:
    return input1 + " Hi"

def function2(input2:str) -> str:
    return input2+ " There"
The above code snippet defines 2 very basic functions. 'Function1' just adds "Hi" to it's input and returns it. And 'Function2' just adds "There" to its input and returns it.
Now the JUICY Part:
from langgraph.graph import Graph

Workflow = Graph()

Workflow.add_node("node_1", function1)
Workflow.add_node("node_2", function2)

Workflow.add_edge('node_1', 'node_2')

Workflow.set_entry_point("node_1")
Workflow.set_finish_point("node_2")

app = Workflow.compile()
Just like discussed before we set up 'function1' as "node1" and 'function2' as "node2". Add an edge between the 2 nodes. Set "node1" as entry point and "node2" as the finish point. And that's it. This is the main ideology behind LangGraph. And now we can use this exact same method to build the strongest AI Agent.
Now run this agent on the given user prompt
app.invoke("hello")
'hello Hi There'
And that's all it takes to build with LangGraph😎
LangGraph: Level 2
Now that we have seen the basics of LangGraph let's make our Workflow a little more useful by adding LLM call

This is a simple code snippet using Langchain to use chat models of openai
from langchain_openai import ChatOpenAI

model = ChatOpenAI(temperature=0.8)

model.invoke("Hey there").content
'Hello! How can I assist you today?'
Now we just have to modify our functions to handle calling of a llm model
def func1(input1: str)->str:
    return model.invoke(input1).content

def func2(input2: str)->str:
    return "Agents says:" + input2
Now just follow the previous Workflow
Define Nodes (aka functions) --> Define edges between Nodes --> Define Entry Point --> Define Finish Point
from langgraph.graph import Graph

Workflow = Graph()

Workflow.add_node("node_1", func1)
Workflow.add_node("node_2", func2)

Workflow.add_edge('node_1', 'node_2')

Workflow.set_entry_point("node_1")
Workflow.set_finish_point("node_2")

app = Workflow.compile()
And now with everything set up run our LangGraph Agent
app.invoke("aaj date kya h?")
'Agents says: Maine Internet ki permission nahi hai, isliye main aapko current date and time provide nahi kar sakti. Aap apne device ya kisi aur source se current date aur time pata kar sakte hain.'
LangGraph: Level 3
Now that we have added LLM function calling to our LangGraph Agent there is just one thing left to make an amazing AI Agent i.e. Tools
Tools gives us extraordinary power by providing some extra information that the agent needs and solve any complex problem. Here we will be using 'OpenWeatherMap' API to get the weather of any city using our Agent
Visit this link to make an account with Open Weather Map org and you will get your API Key without the need to use your Credit Card. Now let's go through the code to use its Langchain wrapper and the weather report of any city
pip install pyowm
from langchain_community.utilities import OpenWeatherMapAPIWrapper
from dotenv import load_dotenv
import os

load_dotenv()

os.environ["OPENWEATHERMAP_API_KEY"] = os.environ.get("OPENWEATHERMAP_API_KEY")

weather = OpenWeatherMapAPIWrapper()

weather_data = weather.run("New Delhi")
print(weather_data)
In New Delhi, the current weather is as follows:
Detailed status: haze
Wind speed: 2.57 m/s, direction: 300°
Humidity: 18%
Temperature:
  - Current: 33.09°C
  - High: 33.09°C
  - Low: 33.09°C
  - Feels like: 30.9°C
Rain: {}
Heat index: None
Cloud cover: 0%
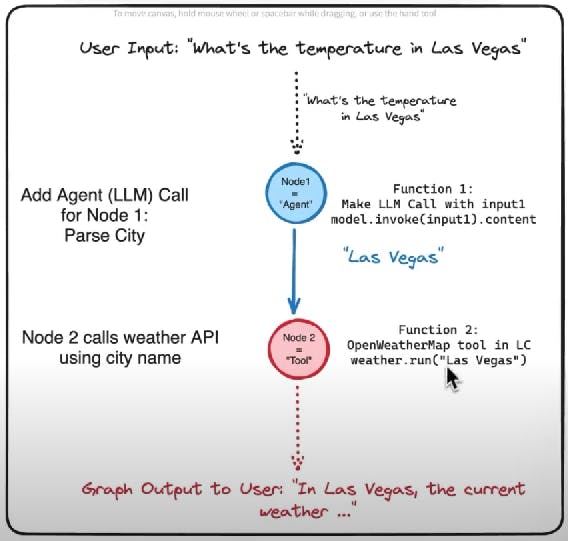
Now we have to modify our 'function1' in such a way that given any prompt the LLM call output just contains the name of the city . And 'function2' just picks the name of city generated before and uses OpenWeatherMapAPIWrapper() to get the weather report for that city
def function1(prompt: str)->str:
    complete_prompt = f"Your task is to provide only the city name based on the user query. Nothing more, just the city name mentioned. Following is the user query: {prompt}"
    return model.invoke(complete_prompt).content

def function2(input1: str)->str:
    return weather.run(input1)
Now let's compile our functions into the nodes of our agents and invoke our LangGraph Agent
from langgraph.graph import Graph

Workflow = Graph()

Workflow.add_node("agent", function1)
Workflow.add_node("tool", function2)

Workflow.add_edge('agent', 'tool')

Workflow.set_entry_point("agent")
Workflow.set_finish_point("tool")

app = Workflow.compile()
app.invoke("What is the weather right now in Kanpur")
'In Kanpur, the current weather is as follows:\nDetailed status: clear sky\nWind speed: 6.4 m/s, direction: 305°\nHumidity: 6%\nTemperature: \n - Current: 38.78°C\n - High: 38.78°C\n - Low: 38.78°C\n - Feels like: 35.41°C\nRain: {}\nHeat index: None\nCloud cover: 0%'
Conclusion
If you made it so far Private. You Deserve it!!

All jokes apart this covers everything there is to the basics of LangGraph. Now go on and build some amazing AI Agents
In the upcoming blogs, we will be covering more advanced concepts of LangGraph