Code your First DAPP
Learn to create your first decentralized application on ethereum and ether.js
I don't know about you but whenever I open twitter to shitpost , I just get distracted by everyone just talking about Web3 ecosystem and how building this ecosystem is like building internet companies in early 2000s . So if you are the same and ever wondered how to create a basic Decentralized Application on ethereum then you are gonna enjoy this read!!!
Prerequisites
To make anything on blockchain you should have a decent grab over web2 topics
- Very basic knowledge of HTML & CSS
- Knowledge of Asynchronous programming in Javascript
- Basic idea of smart contracts and solidity
For this tutorial we will be using metamask as our digital wallet and remix IDE for compiling and deploying our smart contract
Now the FUN Starts
1. Setting up Metamask
- Download the Metamask wallet extension if you haven't
- Switch to Ropsten Testnet from the Ethereum Mainnet by clicking on the top
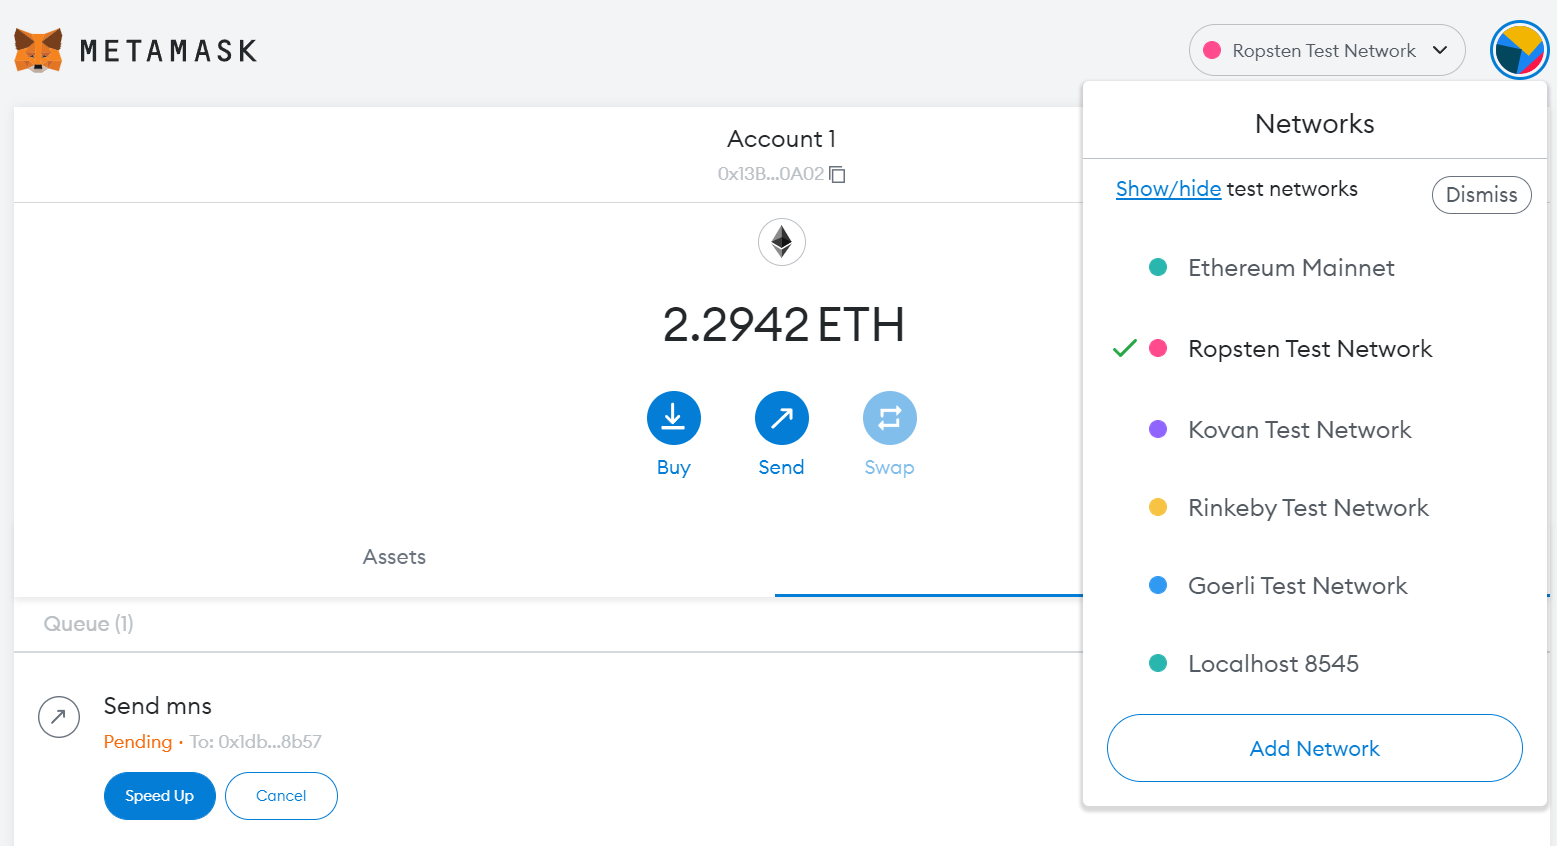
If you are working with metamask for first time then probably you will have 0 etheres on any testnet but here is the amazing thing since these are testnet ethers on this network have no valueso you can get it for free from any faucet by entering your metamask wallet address Faucet link to request funds
2. Create and Serve a Simple Webpage
The first step is to create a basic HTML page.
- Create a new folder (directory) in your terminal using mkdir
- In a code editor (e.g. Atom, or Visual Studio Code), open the folder
- Create a new file called index.html
- Open index.html
- Create HTML boilerplate
- We will need a label, an input, and buttons.
<!DOCTYPE html>
<html lang="en">
<head>
    <meta charset="UTF-8">
    <meta http-equiv="X-UA-Compatible" content="IE=edge">
    <meta name="viewport" content="width=device-width, initial-scale=1.0">
    <title>My first Dapp</title>
</head>
<body>
    <div class="">
        <h1>This is my first Dapp</h1>
        <p>Here we can either set the mood or read the mood</p>
        <button onclick="getMood()">Get Mood</button> <br>
        <input type="text" id="mood" placeholder="Input Mood">
        <button onclick="setMood()">Set Mood</button>
    </div>

</body>
</html
>
OPTIONAL: Create a new file index.css , add some styles to make it look nicer
body {
    text-align: center;
    font-family: Arial, Helvetica, sans-serif;
  }

div {
    width: 20%;
    margin: 0 auto;
    display: flex;
    flex-direction: column;
}

button {
    width: 100%;
    margin: 10px 10px 5px 0px;
    border-radius: 2rem;
}
Feel free to add more styling as to be honest ui looks kinda ugly
- Install a http server. Use any you like, but we recommend lite-server for beginners:
npm install -g lite-server #install lite-server globally
- Serve the webpage via terminal/command prompt from the directory that has index.html in it and run:
lite-server
- Go to http://127.0.0.1:3000/ in your browser to see your page!
Your front end is now complete!
3. Create a Basic Smart Contract
For this tutorial we will be using Remix IDE
Make a new file mood.sol in the file structure and specify the solidity version you want to use
pragma solidity >=0.7.0 <0.9.0;
Create a contract moodDiary
pragma solidity >=0.7.0 <0.9.0;

contract moodDiary{

}
Define a string variable that stores the value of mood and a function getMood() that returns it's value
pragma solidity >=0.7.0 <0.9.0;

contract moodDiary{

      string mood;

      function getMood() public view returns(string memory){
        return mood;
    }
}
Also define a function that can change the state of variable mood on the blockchain i.e. setMood()
pragma solidity >=0.7.0 <0.9.0;

contract moodDiary{

      string mood;

      function getMood() public view returns(string memory){
        return mood;
    }

      function setMood(string memory _mood) public{
        mood = _mood;
    }
}
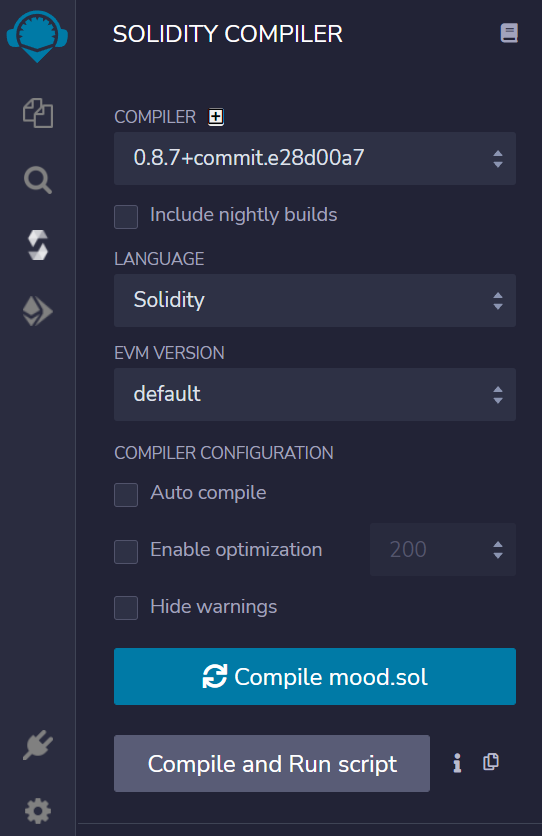
Compile the solidity file
Deploying on Ropsten Network
Make sure that you are on Ropsten testchain on your Metamask wallet on the Deploy/Run section of remix select Injected Web3 as encironment
Click on Deploy button It will take some time so take a sip of your coffee as this transaction is being added to the blockchain
Remember to copy:
The deployed contract's address Copy it via the copy button next to the deployed contracts pulldown in remix's Run tab
The contract ABI Copy it via the copy button under to the contract in remix's Compile tab (also in Details)
4.Connect your Webpage to your Smart Contract
Back in your local text editor in index.html, add the following code to your html page:
Import the Ethers.js source into your index.html page inside a new set of script tags:
<script src="https://cdn.ethers.io/lib/ethers-5.2.umd.min.js"
type="application/javascript"
></script>

<script>
  ////////////////////
  //ADD YOUR CODE HERE
  ////////////////////
</script>
Inside the script tag, import the contract ABI (what is that?) and specify the contract address on our provider's blockchain:
```const MoodContractAddress = ""; const MoodContractABI = let MoodContract; let signer;
For the contract ABI, we want to specifically navigate to the JSON Section. We need to describe our smart contract in JSON format

```const MoodContractABI = [
    {
        "constant": true,
        "inputs": [],
        "name": "getMood",
        "outputs": [
            {
                "internalType": "string",
                "name": "",
                "type": "string"
            }
        ],
        "payable": false,
        "stateMutability": "view",
        "type": "function"
    },
    {
        "constant": false,
        "inputs": [
            {
                "internalType": "string",
                "name": "_mood",
                "type": "string"
            }
        ],
        "name": "setMood",
        "outputs": [],
        "payable": false,
        "stateMutability": "nonpayable",
        "type": "function"
    }
]
Next, Define an ethers provider. In our case it is Ropsten:
const provider = new ethers.providers.Web3Provider(window.ethereum, "ropsten");
Request access to the user's wallet and connect the signer to your metamask account (we use [0] as the default), and define the contract object using your contract address, ABI, and signer
provider.send("eth_requestAccounts", []).then(() => {
  provider.listAccounts().then((accounts) => {
    signer = provider.getSigner(accounts[0]);
    MoodContract = new ethers.Contract(
      MoodContractAddress,
      MoodContractABI,
      signer
    );
  });
});
Create asynchronous functions to call your smart contract functions
async function getMood() {
  const getMoodPromise = MoodContract.getMood();
  const Mood = await getMoodPromise;
  console.log(Mood);
}

async function setMood() {
  const mood = document.getElementById("mood").value;
  const setMoodPromise = MoodContract.setMood(mood);
  await setMoodPromise;
}
Test Your Work Out!
- Got your webserver up? Go to http://127.0.0.1:3000 or http://localhost:3000/ in your browser to see your page!
- Test your functions and approve the transactions as needed through Metamask. Note block times are ~15 seconds... so wait a bit to read the state of the blockchain
- See your contract and transaction info via https://ropsten.etherscan.io/
- Open a console (Ctrl + Shift + i) in the browser to see the magic happen as you press those buttons
DONE!
Celebrate! You just made a webpage that interacted with a real live Ethereum testnet on the internet! That is not something many folks can say they have done!